Every Day Carry – A Metal Detectorist’s “Battle Rattle”
Published by Eric Reed on 10/14/22
In my experience there seem to be some parallels with the process of gear selection of going into battle and the metal detecting world. In this article we’ll discuss many different types of gear – focusing specifically on what I carry, and perhaps more importantly, the lessons learned and some pro tips as to “why” I carry it.

Eric Reed of Reawakening History
Let’s start with a general definition. “Battle Rattle”: the totality of the gear and other equipment a soldier carries to get through the day, from mission-specific gear to general supplies. I.E., weapon, ammunition, knife, helmet, flak vest/ballistic plates, elbow/knee pads, gas mask, canteen/water bladder, all which, as the name denotes, can “rattle” when hiking across terrain.
All gear is carefully-selected and designed to make the soldier as independently mobile, capable and survivable as possible. Aside from a few core standardized items, troops select what they carry based on their preference, perceived importance, and individual physical capability to carry what they select.
It’s All About Preference
Over the years I have witnessed detectorists carrying a wide range of individual detecting gear. Aside from a metal detector and headphones, some detectorists are completely happy heading off into the fields or forests carrying only a hand trowel and a finds pouch. Some also tote a sturdy shovel, pinpointer, and perhaps a small backpack for some bottled water and a snack. Then there’s folks like myself, who strive to (somewhat reasonably) gear up with an array of tools and supplies to address almost any eventuality that may present itself…from a cell phone battery dying, to protection against rain/inclement weather, to being stranded and surviving for a day or more deep in the woods.
My personal gear selections admittedly aren’t for everyone, but I hope they offer some insight that may give others some helpful ideas. While still evolving, my gear choices have been distilled over years of lessons-learned, including unexpected equipment failures, surprise pop-up weather, and even a precarious situation of being lost in the middle of several hundreds of acres of wilderness with night rapidly approaching!

Figure 1
In Figure 1 is a recent picture of my “daily carry” gear. While not all-inclusive it fairly represents what I take with me on any given metal detecting trip. Adjustments to my gear selections are made on a trip-by-trip basis based on number of factors, including: 1) target environment/terrain (plowed field, woods, hilly terrain, etc) (Note: I don’t cover water detecting gear in this article, as that’s another topic altogether!), 2) weather (mid-summer in a field, rain, cold/freezing temperatures, etc), and 3) hiking distance necessary to reach the target area, which equals the reciprocal distance away from my Relic Rogue all-terrain detecting vehicle and thus ability to resupply/swap out gear.
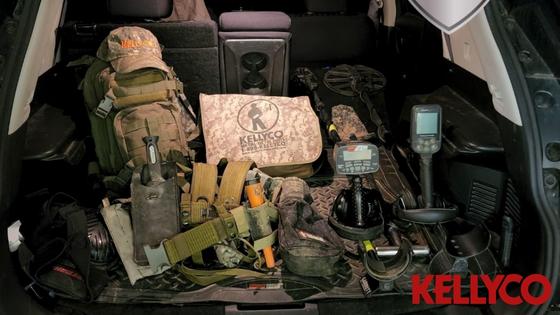
Figure 2
Here in Figure 2 is a picture of all that gear packed and loaded in standard configuration, ready for deployment in the Relic Rogue!
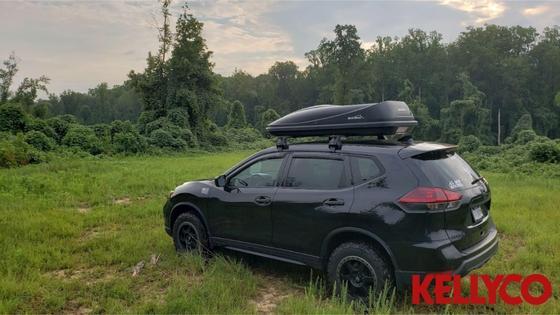
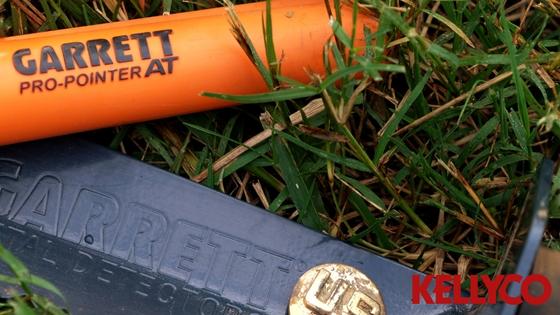
Figure 3
Figure 3 sets the scene…a random example of the back-country I trek into in search of treasure and adventure! Many of these adventures involve four-wheel driving and hiking into the middle of several hundred acres, targeting likely colonial-era home sites or areas of civil war troop activity.
Let’s start breaking down the gear! Using Figure 1 we’ll partition the gear by quadrant, describing each item and why I carry it. The first quadrant is captured in Figure 4, which contains some of the core elements of my daily carry.

Figure 4
Quadrant One – Detectors, Shovel, Boots, Backpack & Other
Item #1 – Garrett AT Max metal detector. My primary detector. I’ve used the Max for several years, learning its idiosyncrasies, its strengths and weaknesses, to the extent where the machine now feels like an extension of my arm and ears. At the end of the day, that should be any detectorist’s goal, to learn their machine and its performance characteristics so well that its use becomes second nature. I’ve recovered a plethora of relics from the 1500s forward with the Max. Note that I have the Garrett 5″ x 8″ DD Multi-Flex Ripper search coil installed — this is my default coil pairing for the AT Max. I have found that with a fine-tuned ear the 5″ x 8″ Ripper coil detects targets nearly as deep as the stock Garrett 8.5″ x 11″ Raider coil. In addition, the 5″ x 8″ coil is much lighter, executes an awesome level of target separation in trashy environments, and is able to be snaked in and out of underbrush much more easily than larger coils, which is important as some of my favorite sites are heavily forested or vegetation-laden.
Item #2 – Nokta Simplex+ metal detector. Normally relegated to my back-up detector, the Simplex is often pressed into action as my primary detector. Why? Simply put, the Simplex is a reliable solid performing machine that provides a slight variation in operating frequency (12KHz vs 13.6Khz for the AT Max) and pulse/coil performance that often pulls targets from a previously declared “cleaned out” site. You can read more about the Simplex+ in my article “Nokta Makro Simplex Metal Detector Review”.
Item #3 – NEL Thunder 14.5″ x 10.5″ Coil (for AT Max). Spare coil for when I want to go extra deep in a relatively trash-free environment. To be fair the stock Garrett coils tend to hold their own depth-wise. However, in certain circumstances having this super-sized coil paired with the AT Max helps to not only shoot deeper, but to cover more ground faster. Due to its size and weight this coil stays in my spare gear bag in the Relic Rogue unless I am fairly certain I will want to use it at some point during the day’s hunt.
Item #4 – Garrett 8.5″ x 11″ DD Multi-Flex Raider Coil. The stock coil for the AT Max, I carry this as a spare/back-up (reference rationale in Item #1 above). Don’t get me wrong, the Raider is a solid-performing coil. I periodically use it in relatively open areas where I have to cover more ground more quickly than the 5″ x 8″ Ripper coil will allow, however most often the 8.5″ x 11″ stays in the gear bag as a ready spare.
Item #5 – Predator Tools Model 35 Piranha Shovel. I’ve used this same Piranha shovel for the past seven years and it has performed flawlessly. It’s light, sharp, extremely strong, and has pried up many, many unimaginably huge rocks and logs. The serrated blade is made from Chrome-Molly 4130 Aircraft quality steel which has slashed and sliced its way through thousands of roots and debris with ease. This is critical for those of us that enjoy hunting predominantly in the woods. Additionally, it may be hard to see, but a few years ago I Plasti-Dip coated the main shovel shaft. This was a very helpful lesson learned after years of hunting on very cold Winter days that saw my wet-gloved hand stuck to the shovel! The rubberized Plasti-Dip coating also aids grip in general, and helps differentiate/identify the shovel if it’s lost or mixed up with other detectorist shovels at a large group hunt. Of note, there are several different colors of Plasti-Dip with which to get creative!
Item #6 – Knee Pads. Let me emphasize….GOOD knee pads. Not those flimsy foam knee pads that resemble a kitchen dishwashing sponge with an elastic band attached. I’m talking about heavy duty molded hard plastic knee pads that fully protect your knees. Have you ever dropped down to your knees with all your weight to dig a target and impaled your knee on a piece of ancient glass? I did years ago and since that day I’ve ensured I have the right protective equipment. A quick visit to the hardware section of your local big box home improvement store will provide many options, and a visit to your favorite online store will garner even more options. It’s also important to find knee pads that fit you well and don’t easily slide off your knee, to prevent the fastening strap from rubbing and chaffing the back of your knee and legs..
Item #7 – Boots. What I said in Item #6 applies…GOOD boots. As a rule they should be waterproof, and depending on your detecting environment you may want some level of insulation. I also choose boots that have a protective reinforced toe/toe cap and shank to prevent foot damage from an errant shovel strike, falling log, puncture wound, etc. Note: it’s important that the protective reinforced toe/shank be made of a composite non-conductive material, nylon/Kevlar, etc, and certainly not steel! It sounds funny to hear stories about a detectorist madly chasing invisible targets that turn out to be his boot’s steel toes, but I’ve actually seen it happen! Oh, and if you plan to detect in cold climates, remember it’s a good idea to get boots that are 1/2 to one full size bigger than normal to accommodate a good pair of wool boot socks.
Item #8 – Wellies. Aka muck boots, rubber boots, rain boots, etc. Whatever you call them, these tall rubberized boots are the ideal answer for those marshy areas, small streams, or days when the weather forecaster gets it completely wrong and you are in danger of growing gills and webbed feet! Combined with good upper-body weather protection these boots can save a detecting trip from being a washout. As with regular boots, a composite protective reinforced toe/toe cap and shank will help prevent a trip to the emergency room.
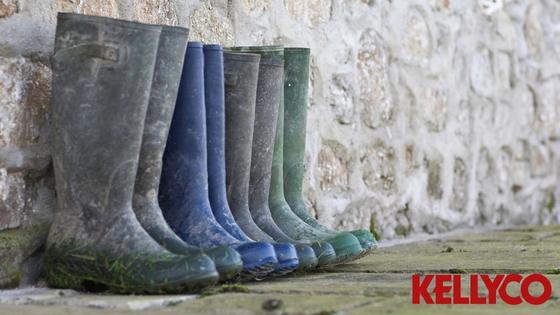
Wellington Boots
Item #9 – Spray Bottles for Relic Cleaning. I actually don’t use these as much as I used to, and they are on the verge of being phased off of my checklist. Any relic field cleaning done these days tends to be accomplished with a soft bristle toothbrush or toothpick, which is certainly true for any coin or buttons. However, for those brass or other non-ferrous relics that benefit from a little wash to discern features, I still carry one small spray bottle of water and one of Windex. Yes, Windex. I’ve found a couple quick sprays of Windex followed by a water spray rinse garners excellent results. But again, only in very specific circumstances.
Item #10 – Small Military-Spec Backpack. Another piece of gear that is worth your while to spend a little more money to get a little more reliability. A detectorist’s backpack can take a beating…in the back of the truck, out in the field, being scraped and smacked against trees, etc. The last thing you want to happen is to develop a tear that then gets hooked by a branch and becomes a larger hole from which gear can escape! This happened to me after using a cheaper generic backpack, which led to my acquisition of a new mil-spec backpack. That backpack has a large primary gear compartment, a medium compartment with various sub-compartments/pockets, and a smaller compartment on the outside. A mil-spec backpack will also likely have a chest strap which helps your stability and reduces back strain when hiking up and down hills. It will also likely have a molle strapping system on the outside, enabling attachment of various other drink carriers, sheaths, etc. I’ll cover what I carry in the compartments in a subsequent section in this article. Of note, I do not wear a backpack full-time while detecting. Once I recover a few relics in an area I routinely take off the backpack and hang it on a tree branch centrally positioned within the sector I plan to search. This saves wear and tear on my back and legs, yet keeps my supplies close. In dense forests or vegetation it can sometimes be difficult to keep a visual line of sight on the backpack, so I also carry a small blaze orange hunting-type vest which I drape around the hanging backpack…this helps immensely, and also could be worn or hung as a visual cue for rescuers in an emergency situation, or worn during deer, turkey, and other hunting seasons. I carry an additional blaze orange vest during those various hunting seasons, one for me, one for my backpack!
Item #11 – Spare Gear Bag. Any type of sturdy gear bag will do since it generally stays in the truck to be sourced from when needed. My choice for the past several years has been a Kellyco gear bag with a shoulder-carry strap.
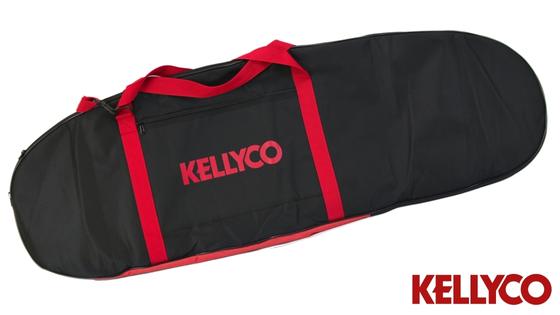
Red Elite Metal Detector Bag
Item #12 – Light Coat. This item is always present in my daily carry gear, unless of course it’s mid-summer and 100 degrees! If I’m not wearing the coat I securely tie the arms around the top handle of my backpack so it hangs off and doesn’t take up valuable space inside the backpack. The type of coat is important too. In this example I show a fleece-type coat, however depending on the weather and environment a light/waterproof nylon or Gortex type coat is a great choice, particularly one with a fold-away hood. Of course, if it’s a cold weather hunt a heavier cold weather coat is in order. In all cases I have made a practice of pre-spraying my coats with a Scotchguard-type waterproofing solution, which has paid dividends more times than I can count.
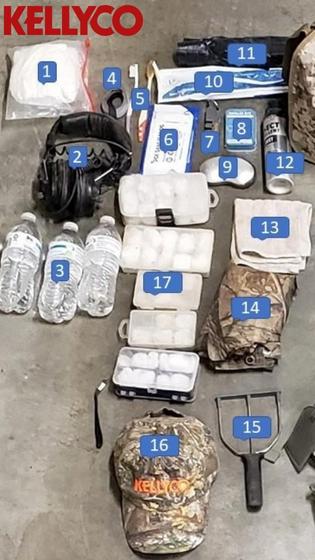
Figure 5
Quadrant Two – Backpack Contents
Item #1 – TP. Aside from water, in my estimation toilet paper is one of the most critical commodities to ensure you have in your backpack! To help keep a flat profile tissues are a suitable substitute. In either case an easy-open ziplock plastic bag is used to keep the contents dry and ensure quick access (for obvious reasons!).
Item #2 – Spare “Wired” Headphones. If I’m hunting relatively close to my vehicle, these stay in the gear bag. However, if I’m hiking a half hour or more away from the vehicle they’re in my backpack, no question. This owes to a lesson learned in the field, when a pair of wireless headphones decided to go on the fritz and couldn’t be resuscitated. Yes, I could have gone headset-less, which I did for a time that given day, but if the targets are deep and faint and there’s any surrounding ambient noise it can greatly reduce your effectiveness. This situation occurred a second time when a charging block failed and, unbeknownst to me until I was in the field, my headphones didn’t charge. There’s a great sense of satisfaction being able to simply say, “oh well”, then pull out my wired headphones and continue to swing and recover relics!
Item #3 – Water. One of the main items that could cut a hunt short, or worse, put you in a serious medical situation. I carry five bottles, often 2-3 of which are Gatorade. One in a designated pouch on my gear belt for easy access (more on that later), and four in my backpack. Yes, they do add more weight than much of the other gear, however, I find this acceptable since 1) each bottle drank commensurately reduces the backpack load, and 2) if I’m ever stranded back in the woods, fresh water is the #1 life-saving item I will want. During southern Virginia’s summer months I’ve routinely emptied four of the five bottles. And of course, I pack-out my empties. Tip: crush the empty bottle and screw on the cap while still compressed/crushed…makes for a tiny item to pack-out! I did try a harness-mounted water bladder system (i.e. CamelBak), however, it did not work for my system of detecting. As mentioned in Quadrant 1, Item #10 (Backpack), once I enter a zone of targets I routinely hang my backpack, which contains my extra bottles of water, on a tree branch or set it in the field. When I used the water bladder the added weight stayed strapped to me all day. I could have taken the bladder off with the backpack, and the weight does reduce over the course of the day as it is drunk, however in my estimation the trade-off wasn’t worth it. Pro Tip: aside from water, like many others I like a different morning beverage…my morning coffee, normally very dark, nothing added, and hot. However, on these steamy southeast Virginia mornings when it’s already 80+ degrees before the sun comes up, hot coffee is a little less enjoyable. Instead, I save time during my morning trip prep and have a much more enjoyable morning beverage by brewing a partial pot of coffee the night prior, stick it in the refrigerator overnight, and then quickly mix it with a little flavored creamer I keep just for this purpose in the morning for an “iced” coffee jumpstart! Fast, cheap, and refreshing!
Item #4 – Velcro nylon straps. A light, general utility item that is handy for light strapping/securing of gear or any number of other purposes, much like zip-ties (which I also carry, but are not pictured).
Item #5 – Extra Cleaning Brushes. Toothbrushes…one of the best in-the-field cleaning tools ever. Other than my detector, shovel and pinpointer, the toothbrush is probably my most used tool. I have one soft bristle brush on my tool web belt (more on that later), and keep two (one soft bristle, one stiff bristle) in my backpack. I could carry just one spare, but I’ve given one to fellow detectorists in need several times, so I go with two spares.
Item #6 – Wet Wipes. Purely discretionary, but as with the velcro nylon straps and zip-ties, they’re good to have when you need them.
Item #7 – Small Knife Sharpener. Purpose is self-explanatory, and very nice to have when you need it. I’ve used the knife sharpener a number of times on long organized group hunts away from home. Stays clipped to a D-ring built into the inside of one of my backpack compartments, ready for use.
Item #8 – Small Eyeglasses Repair Kit. For those that wear glasses, these kits are a great insurance policy against a ruined hunting trip! Thankfully I haven’t had the opportunity to use the kit yet.
Item #9 – Battery-powered Hand-Warmer. On those very cold hunting days, this device is a game changer. Multiple heat levels, lasts for hours, and charges via USB. I recall a detecting trip a couple years ago in particular, it was only 6 degrees. I could have (perhaps should have), pressed the easy button and not headed out the door that frigid day. It was one of those bitter breezy cold days when your wet-from-the-snow gloved hands stick and attach themselves to your metal shovel! (Unless, of course, you Plasti Dip-coat the handle! See Quadrant 1, Item #5). About every 20-30 minutes I would take off a glove and hold the hand-warmer, with my hand tucked inside my coat. Voila! Back in action. In my opinion this USB-powered solution works better than the small chem-packet warmers for hand warming, and it is rechargeable in the field using a USB charge back (I’ll cover this in a bit).
Item #10 – Life Straw. This is truly a worst case scenario piece of gear. If I am ever stuck out in the boonies in a situation where I have expended all five bottles of water and am forced to use the Life Straw, I’m going to be very, very glad I have it. Again, venomous snakes happen, venomous spiders happen, rabid critters happen, broken legs or concussions from a fall happen. Any one of those scenarios in the middle of 800 acres is absolutely not the time to say the words “I wish I had….”.
Item #11 – Black Plastic Lawn Bags. Yet another of one of the most versatile pieces of gear you can carry. From an emergency rain poncho (I’ve loaned them to fellow detectorists for use as such…), to a bag to haul out extraneous trash found on a hunt site (been there, done that…), to a moisture barrier ground cloth or water-catch in an emergency situation, plastic bags come in handy. Note: if stranded out in the wilderness, one way to make yourself more visible to rescuers would be to wear one of these bags as a poncho. A large black object is not the norm in the wild, and the human eye is automatically drawn to the shape and contrast against the outdoor background.
Item #12 – Insect Repellent. This item can save a frustrating day in the field. Deet-based repellents are most effective, particularly against ticks. I never leave home without it.

Golf Towel
Item #13 – Hand Towel. Primarily to wipe your face/arms of dirt or sweat. An old kitchen dish cloth or washcloth works great. I’ve also used it to wrap & pack an old bottle found while hunting from time to time.
Item #14 – Rain Poncho. Another day-saver. A small form factor poncho fits over whatever gear you may be wearing and is insurance against a bad weather forecast. Unless the sky is solid blue and the forecast for 0% likelihood of precipitation, it’s in the backpack.
Item #15 – Relic Probe. You may be saying, “Wait, what?? That’s a turkey fork!”. You’d be right! However, it’s also an awesome, inexpensive, multi-prong relic probe! The idea came to me a couple years ago while brainstorming a solution that would allow me to quickly and effectively probe a wide, shallow midden (Midden = area where trash/waste was tossed, often out the window of a colonial period home). I own a single prong probe, essentially a screwdriver with a pointy tip, however, poking the ground with that single probe would take way, way too much time. So, I began searching for a multi-prong tool with at least 4-5 inch tines…and stumbled onto the picture of a turkey lifting fork. Perfect! The prongs of a turkey fork are slightly bent in the middle, so I laid the fork on the workbench and used a rubber mallet to straighten them. Voila’, a multi-prong relic probe! And it worked perfectly. The first trip with the probe I recovered a colonial era glass inkwell and many shards of period china and glassware.
Item #16 – A Hat. Now, to preface, I am not a hat guy. Even after being required to wear a hat during my 20 years in the military, I’m still not a hat guy. However, as a rule I now always detect with a hat on, for two reasons: the sun and bugs. My military-style crew cut provides the scalp little defense against the sun, so the hat protects that area as well as my forehead/face. Before each trip I also spray the outside of my entire hat (and all of my outer-wear!) with insect/tick repellent, which works wonders in keeping the wee critters at bay. At this juncture it’s also worth noting that this process of spraying all of my clothing, even the top of my socks and boots, with a good quality Permethrin-based insect/tick spray (I religiously use “Sawyer Products Premium Permethrin Insect Repellent”) pays huge dividends. In all my years of detecting hot, humid southeast Virginia where ticks are rampant, I’ve only ever found two (yes, 2) ticks on me!
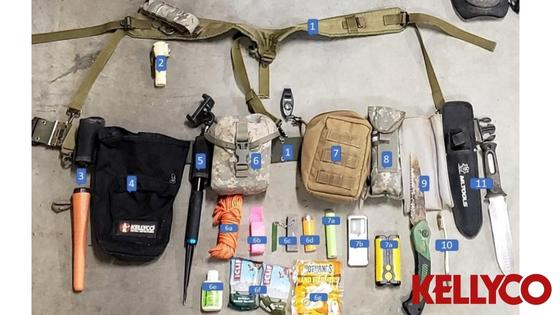
Figure 6
Quadrant Three – Gear Harness/Web Belt
Item #1 – Gear Harness. I use an authentic military (most military surplus stores carry them) All-Purpose Lightweight Individual Carrying Equipment (ALICE) load-bearing harness and web belt set. As of this writing I’ve since upgraded to a more modern version that looks nearly identical, however it uses nylon buckles and web/velcro fasteners versus metal clips that are much easier to adjust and much more comfortable. This is a very versatile set-up that accommodates as much/little gear as I wish to carry.
Item #2 – Flashlight. This small but yet very powerful 90 degree/right angle light is a leftover piece of equipment from my firefighting days that now serves perfectly for my metal detecting adventures! It fits in the small camo pouch directly above it (see Figure 6) that is attached to the left ALICE harness shoulder strap. This puts the flashlight in a very accessible location on my left chest, with the on/off button easily activated from the top of the flashlight. This configuration allows me to operate hands-free with the flashlight on, either as I’m detecting or inspecting a recovered item.
Item #3 – Garrett Pro-Pointer AT. My go-to pinpointer. The pinpointer’s sheath is attached to the web belt and I use a lanyard from the belt to the pinpointer to protect against accidental loss. I replaced the clip hook that connects the lanyard to the pinpointer with a round split ring/key ring, which
Garrett Pro-Pointer AT
provides a much more reliable and secure connection. Also of note, I have used a rechargeable 9 volt battery in the Pro Pointer AT for many years, which works great and saves money!
Item #4 – Kellyco Sifter Finds Pouch. One of the newer pouches that Kellyco introduced over the last couple years, this one rocks. The bottom of the pouch is made of a heavy duty nylon mesh material, which, as the name denotes, helps to “sift” away extraneous dirt, sand, etc from finds placed in the main compartment of the pouch. The pouch also has a secondary mid-size compartment and a smaller zipper-secured outer pocket, both without a mesh bottom. The belt loops on the pouch accommodate a standard inch belt width, so if you use a wider belt, such as my military web belt, an alternative fastening method will be needed. I fashioned mine out of inter-looped zip-ties which work great!
Item #5 – Selfie-Stick Spike. A useful companion, I carry a selfie-spike (or selfie-tripod, depending on the terrain) combined with my cellphone to film solo segments of my detecting adventures. The spike allows for very flexible positioning, however a tripod works better on dry, hard-packed soil. I’ve tried carrying the selfie-spike in a sheath on my gear belt, as pictured, and in the main compartment of my backpack, however, having it easily accessible on my gear belt is much more convenient.
Item #6 – Emergency Pouch. This pouch carries the seven items itemized below. Some are clearly emergency-type supplies, some are simply kept in this pouch rather than the backpack for ease of access.
6a – Paracord. Much like zip-ties, paracord is an invaluable multi-use resource in any situation. I’ve used paracord to repair various broken straps or fasteners, and to fashion carrying loops and adhoc lanyards for various tools. Bright, neon colored cordage also helps in low light conditions.
6b – Vinyl Marking Tape. Another of my most-used supplies. A high visibility vinyl marking tape, ideally of a color not found in nature (neon pink, blue, etc) can be wrapped around tree trunks or limbs, dangled from branches, etc, to mark a trail or to mark an area of notable finds you want to return to or to mark quadrants for a grid search. The latter two uses, of course, only on a private permission where others can’t take advantage of your markings!
6c – Magnesium Fire Starter. Purely an emergency tool. Able to be used in wet conditions, ensures the ability to stay warm, boil water, etc.
6d – Lighter. Self-explanatory…generally for emergency use only (or if someone asks for a light!). Have also used this lighter a number of times to singe/melt the frayed ends of paracord, boot laces, etc.
6e – Bug Repellent Lotion. Same purpose as the can of bug repellent in my backpack, but easier access for application “on the fly”.
6f – Energy Bars. Emergency rations. I’ll normally carry a couple sandwiches (PB&J to ensure nothing goes rancid) and/or ziplock bag of beef jerky, etc, in my backpack, but always have energy bars in the pouch for myself or others in an emergency situation.
6g – Chem Pack Hand Warmers. Since I already have a more robust battery-powered hand warmer, these more flexible warming pouches would be used inside my boots, or in a really bad situation in the armpits, where they would help heat the blood passing through the axillary arteries to the arms and rest of the body.
Item #7 – Weapon/Misc Pouch. Primarily for licensed self defense concealed handgun carry. Always in its Kydex holster to prevent damage or accidental discharge, I find a handgun of sufficient caliber to be a vital piece of equipment when detecting back in remote areas where bears, bobcats, or other potential threats are plentiful. Another compartment also houses the below items, and on the pouches easy-open zipper lanyard I have a small break-away emergency whistle/compass combo.
7a – Power-Banks. Primarily for emergency phone charging, the larger of the two power-banks also has a powerful LED light with strobe capability. The last place I want to experience a dead phone is in the middle of several hundred acres and in an emergency situation. At the very least I want the ability to send text messages to alert others to the situation (sending a text uses much less power and less signal strength than making a cellular call), and/or to call 911.
7b – Battery-powered Magnifying Loop. For discerning fine detail on relics in the field. Not an emergency item, but housed in an outer pouch compartment for easy access.
Item #8 – Water Bottle Pouch. Purchased from a military surplus store this former radio pouch serves nicely as a 12 oz water bottle carrier with velcro
Water Bottle
cover flap. The positioning of the pouch on my web belt allows for quick water bottle access while on-the-move.
Item #9 – Folding Limb/Root Saw. This tool is very frequently used. Designed for hunters to quickly and easily trim off small limbs while using a treestand, it’s compact, easily opened and very, very sharp. I routinely use the saw to trim a small limb to make a “hook” on which to hang my backpack whilst detecting a surrounding sector, and/or to saw through roots to get to a relic. By happenstance I stumbled on a pouch/sheath that not only fits the folded saw perfectly, but also has a small narrow compartment in which Item #11 below fits perfectly!
Item #10 – Relic Brush. Aka, a toothbrush! Soft bristles to brush finer relics, but still a very resilient brush. For all of my brushes (and this is why toothbrushes are awesome as cleaning brushes) I sharpen the end of the handle to a relatively fine point. This provides a perfect non-abrasive “detailer” to scrape away dirt from fine lines in relics, poke through holes, etc. The composite plastic of a toothbrush is perfect for this use as it’s strong, thus stays “sharp” a fairly long time yet doesn’t scratch the relics!
Item #11 – Hand Digging Tool. There are a plethora of hand digging tools available, of which I’ve tried several. Most serve their purpose just fine for shallow relic recovery, digging out the walls of a trash pit, etc. My choice of hand digging tool for the past several years, however, has been a MLTOOLS/Hori-Hori 12.5 inch Weeding & Digging Knife. Not your traditional metal detectorist choice of hand tools, this relatively inexpensive digging
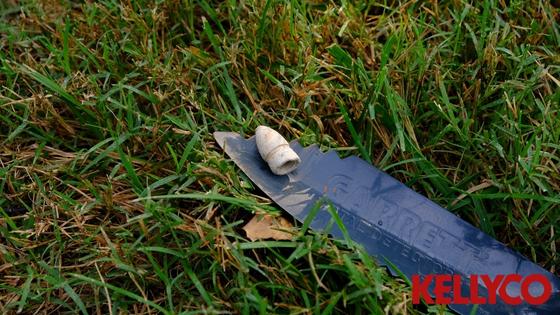
Hand digger with relic.
tool has a blade made of highly polished stainless steel, which means zero chance of rust (as occurs with steel-bladed hand tools). The shallowly-serrated edge is literally knife sharp and easily able to slice/saw through small to medium roots, or even hack away small limbs/brush.
Gear is Like an Opinion, Everybody Has One (or more)!
I hope you enjoyed this snapshot of my Everyday Carry metal detecting “battle rattle”. Hopefully there is an idea or two that will help in your own daily gear selection. At the end of the day, we all settle on the type and amount of gear that make us feel confident that we will get the job done. This never-ending process benefits from detectorists sharing their experiences, their lessons learned, and their opinions. Perhaps this article will spark others to write down aspects of their detecting processes and journey to share with others!
Happy Hunting!